If you are planning to keep discus fish in India, this complete guide will help you with tank setup, food, water conditions, and buying tips. Discus fish are beautiful but require proper care to survive.
Discus fish হলো aquarium world-এর “King of Aquarium Fish”। এদের গোল আকৃতি, উজ্জ্বল রং এবং graceful movement-এর জন্য অনেক fish lover এদের পছন্দ করে। তবে Discus fish একটু sensitive, তাই সঠিক care না জানলে সহজে মারা যেতে পারে।
এই guide-এ তুমি জানতে পারবে—Discus fish price in India, tank setup, food, water condition এবং beginner tips।
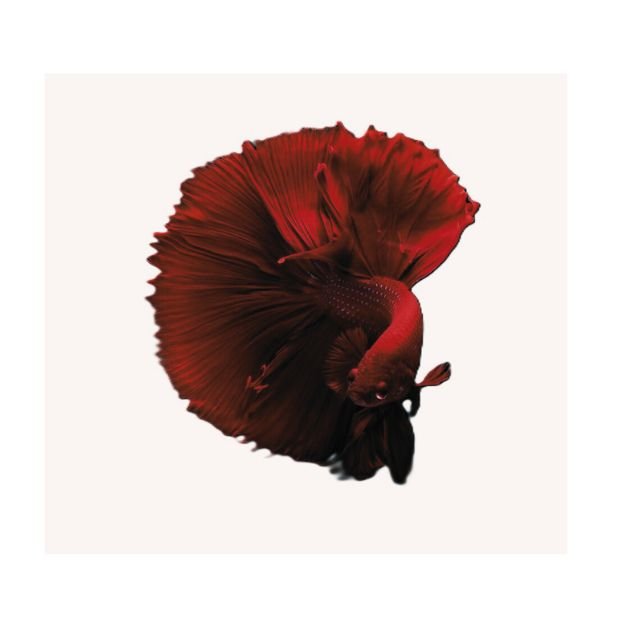
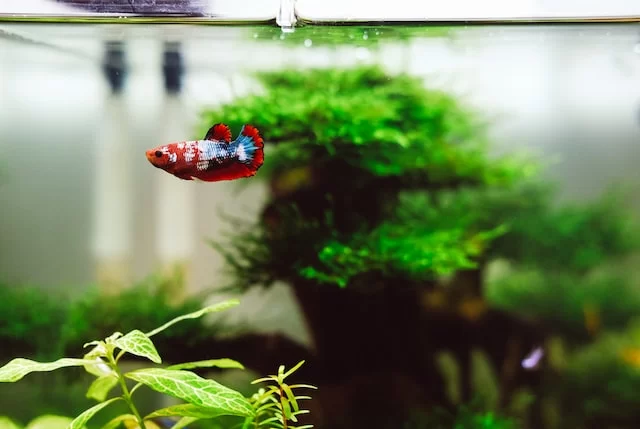
Betta fish are one of the most popular aquarium fish in the world. They are known for their bright colors and beautiful flowing fins. Because they are relatively easy to care for, betta fish are a great choice for beginners who want to start keeping aquarium fish.
However, betta fish still require proper care, including the right tank size, clean water, proper food, and a suitable environment.
In this guide, we will explain everything you need to know about betta fish care, including tank setup, water temperature, feeding, and common health problems.
Table of Contents
What is Betta Fish
Ideal Tank Size for Betta Fish
Water Temperature and Water Quality
Best Food for Betta Fish
Betta Fish Tank Setup
Common Betta Fish Diseases
Tips for Beginners
Frequently Asked Questions
What is Betta Fish
Ideal Tank Size for Betta Fish
Water Temperature and Water Quality
Best Food for Betta Fish
Betta Fish Tank Setup
Common Betta Fish Diseases
Tips for Beginners
Frequently Asked Questions
How long do betta fish live? Betta fish usually live between 3 to 5 years with proper care.
Can betta fish live alone? Yes, male betta fish should usually be kept alone because they are territorial.
Do betta fish need a heater? Yes, betta fish prefer warm water between 24°C and 27°C.
How often should you feed betta fish? Feed betta fish once or twice a day with small portions.
If you want to buy healthy Betta Fish online in India, check our collection here:
Setting up a beautiful aquarium can be a rewarding and relaxing hobby, but it all starts with having the right foundation. If you’re looking to create a stunning aquatic display in your home, a sturdy and attractive aquarium stand is a must.
While you can certainly purchase a pre-made stand, building your own DIY aquarium stand can be a fulfilling project that not only saves you money but also allows you to customize the design to fit your specific needs and aesthetic preferences.
In this step-by-step guide, we will show you how to construct a simple DIY aquarium stand in active voice.
Materials You’ll Need
Before you dive into the construction process, gather the following materials:
Wooden Planks: Choose sturdy, untreated wooden planks. Commonly used woods include pine, oak, or plywood. The amount you’ll need depends on the size of your aquarium, but for a standard 55-gallon tank, you’ll require four pieces for the frame and additional pieces for the shelving.
Screws: Opt for strong, corrosion-resistant screws to ensure the stand’s durability.
Drill: A power drill will make assembling the stand much easier.
Screwdriver: To tighten the screws properly.
Measuring Tape: Essential for accurate measurements.
Level: To ensure your stand is perfectly horizontal.
Saw: You’ll need a saw to cut the wooden planks to the required dimensions.
Sandpaper: For smoothing rough edges and creating a polished finish.
Wood Glue: For added stability in your stand’s joints.
Stain or Paint: To finish your stand with a protective and decorative layer.
Now that you have your materials ready, let’s dive into the construction process:
Step 1: Plan Your Stand Design
Before making any cuts or assembling pieces, sketch a rough design of your aquarium stand. Take into account the size and shape of your aquarium, as well as your personal style preferences. A typical design includes four vertical corner posts and horizontal beams to support the aquarium’s weight. You may also want to add shelves or cabinet doors for storage or a decorative touch.
Step 2: Cut the Wood
Using your measuring tape and saw, cut the wooden planks to the desired lengths according to your design. Ensure that the pieces are cut accurately and that the edges are smooth to prevent any gaps or rough spots.
Step 3: Assemble the Frame
Using the drill, screws, and wood glue, start assembling the frame of your aquarium stand. Begin by connecting the corner posts with horizontal beams, forming a rectangular or square frame that matches the size of your aquarium’s base. Make sure the frame is square and level during assembly to ensure stability.
Step 4: Add Cross Braces
For added strength, consider adding diagonal braces inside the frame. Attach these braces securely to the corners of the frame. This will provide extra stability and ensure your stand can handle the weight of the aquarium and water.
Step 5: Install Shelves or Cabinet Doors (Optional)
If your design includes shelves or cabinet doors, install them at this stage. Shelves can be added between the vertical supports for storing aquarium supplies, while cabinet doors can be attached to conceal the storage area.
Step 6: Sand and Finish
After the basic structure is complete, use sandpaper to smooth any rough edges or surfaces. This step is crucial for achieving a professional and polished appearance. Once sanded, you can apply your choice of stain or paint to protect the wood and enhance its visual appeal. Let it dry completely before moving on.
Step 7: Place Your Aquarium
With your DIY aquarium stand complete, place your aquarium on top, ensuring that it is level and well-centered on the stand. Double-check that all the joints and connections are sturdy and secure.
Step 8: Fill Your Aquarium
Finally, fill your aquarium with water, decorations, and your beloved aquatic creatures. Enjoy the beauty of your DIY aquarium stand as it proudly supports your underwater world.
Conclusion
Building a simple DIY aquarium stand can be a rewarding project for aquarium enthusiasts. With the right materials, tools, and a bit of patience, you can create a sturdy and attractive stand that complements your aquatic display. Whether you’re a beginner or an experienced DIYer, following this step-by-step guide in active voice will help you construct a stand that is not only functional but also a stylish addition to your home. Get started on your DIY aquarium stand today and take your aquarium hobby to the next level!
Discovering a leak in your glass aquarium can be a stressful experience. Water damage to your home and risk to your aquatic pets are immediate concerns that need addressing. Fortunately, repairing leaks in a glass aquarium is often possible without purchasing an entirely new tank. In this comprehensive guide, we will walk you through the process of identifying, preparing for, and executing repairs on your leaking aquarium, helping you save both money and your underwater ecosystem.
Identifying the Source of Your Aquarium Leak
Before attempting any repairs, we must first precisely locate where the leak is coming from. Aquarium leaks typically occur in several common areas:
Seam Leaks
Seam leaks are the most common type of aquarium failure. These occur where two glass panels meet and the silicone sealant has deteriorated or failed. Carefully inspect all seams of your aquarium, paying special attention to:
Bottom corners where multiple panels meet
Vertical seams, especially near the top where water pressure is lowest
The junction between the bottom panel and side panels
Surface Cracks
Glass cracks can develop due to impacts, stress, or manufacturing defects. These are typically visible as straight or spider-web patterns in the glass itself. Even hairline cracks can leak and will usually worsen over time.
Finding Elusive Leaks
If the source isn’t immediately obvious, try these techniques:
Empty the tank and thoroughly dry all surfaces
Fill the tank with just a few inches of water
Place dry paper towels around the exterior of the base
Wait and observe where moisture appears first
For very small leaks, add a few drops of food coloring near suspected areas and watch for color movement
Essential Materials for Glass Aquarium Repair
Gathering the right materials before starting repairs is crucial for success. We recommend having the following items on hand:
100% silicone sealant specifically labeled as aquarium-safe (never use household silicone that contains anti-mold chemicals)
Razor blades or a sharp scraper tool
Isopropyl alcohol (91% or higher concentration)
Clean microfiber cloths
Masking tape
Plastic putty knife
Disposable gloves
Acetone (for stubborn silicone removal)
Fine-grit sandpaper (600 grit or higher)
Important note: Standard household silicone often contains fungicides and chemicals that are toxic to fish. Always use silicone specifically marketed as aquarium-safe or “reef safe.”
Preparing Your Aquarium for Repair
Proper preparation is perhaps the most critical step in ensuring a successful repair:
Emptying and Cleaning
Completely drain the aquarium and relocate any livestock to a suitable temporary habitat
Remove all decorations, substrate, and equipment
Thoroughly clean the interior and exterior surfaces, paying special attention to areas around the leak
Allow the tank to fully dry for at least 24 hours in a warm, low-humidity environment
Removing Old Silicone
For seam leaks, the old silicone must be completely removed before applying new sealant:
Use a razor blade at a 45-degree angle to carefully cut away the old silicone
Be extremely cautious not to scratch the glass
Remove silicone from both the interior and exterior of the leaking seam
A plastic putty knife can help remove larger sections without risking glass damage
For stubborn residue, apply a small amount of acetone and let it sit for 5 minutes before scraping
Complete removal is essential – any old silicone left behind will prevent proper adhesion of the new sealant.
Repairing Different Types of Aquarium Leaks
Repairing Seam Leaks
Clean the area with isopropyl alcohol and allow it to dry completely
Apply masking tape parallel to the seam on both glass panels, leaving approximately 1/4 inch exposure for the new silicone bead
Cut the tip of the silicone tube at a 45-degree angle, making a small opening
Apply a continuous bead of silicone along the entire length of the seam
Using a wetted finger (dip in water with a tiny amount of dish soap), smooth the silicone bead
Remove the masking tape immediately before the silicone begins to set
Allow the silicone to cure for a minimum of 48 hours (72 hours is preferable) before testing
For tanks larger than 20 gallons, we strongly recommend resealing all interior seams, not just the leaking one, to ensure uniform strength and prevent future failures.
Addressing Cracked Glass
Small cracks (less than 1 inch) can sometimes be temporarily repaired:
Thoroughly clean and dry the area around the crack
Apply a thin layer of aquarium-safe silicone over the crack, extending at least 1/2 inch beyond each end
Allow to cure completely
Apply a second layer for reinforcement
Important: This should be considered a temporary fix. Glass cracks tend to spread over time, and a complete panel replacement is often necessary for permanent repair.
Repairing Bottom Seals
Bottom seal leaks are particularly troublesome as they bear the most water pressure:
After removing old silicone, carefully clean the corner junction points
Apply a generous bead of silicone to all bottom seams
Pay special attention to corner junctions, applying extra silicone to create a slightly concave fillet
Smooth carefully with a wetted finger
Allow a full 72 hours of curing time
Testing Your Repair
After the silicone has fully cured (minimum 48 hours, preferably 72), it’s time to test the repair:
Place the empty aquarium outdoors or in a bathtub
Fill with water to about 20% capacity and observe for 1 hour
If no leaks are detected, fill to 50% and observe for 3-4 hours
Finally, fill to normal operating level and observe for 24 hours
If no leaks appear, the repair is likely successful
Never rush this testing phase – discovering a failed repair after reintroducing livestock and decorations is much more problematic than waiting an extra day for proper testing.
Prevention and Maintenance
To avoid future leaks, we recommend these preventative measures:
Inspect silicone seams regularly for signs of deterioration, peeling, or discoloration
Ensure your aquarium is on a completely level surface with appropriate support
Avoid rapid temperature changes which can stress glass and seams
Consider resealing aquariums over 5 years old as preventative maintenance
Never move a partially filled aquarium
Use a proper stand designed to support the full weight of your specific tank size
When to Replace Rather Than Repair
While many aquarium leaks can be successfully repaired, there are situations where replacement is the safer option:
Multiple cracks or cracks larger than 2 inches
Severe chipping along edges
Delamination of tempered glass
Structural bowing or distortion of the frame
Repeated leak issues after multiple repair attempts
For aquariums larger than 55 gallons, professional assessment may be advisable before attempting DIY repairs due to the significant water damage and safety risks associated with large-volume failures.
Professional vs. DIY Repair Considerations
For many standard rectangular aquariums under 55 gallons, DIY repair is quite feasible with careful attention to detail. However, we recommend considering professional repair services for:
Custom, bow-front, or uniquely shaped aquariums
Very large aquariums (75+ gallons)
Tanks containing exotic or particularly valuable livestock
Situations where water damage would be especially costly
Professional repairs typically range from $10-20 per foot of seam for basic resealing to several hundred dollars for complex structural repairs.
Conclusion
Repairing leaks in a glass aquarium requires patience, attention to detail, and the right materials, but it’s a very achievable DIY project for most hobbyists. By carefully identifying the source of the leak, thoroughly preparing the surfaces, using appropriate aquarium-safe silicone, and allowing adequate curing time, you can often restore your aquarium to full functionality without the expense of replacement.
Remember that proper preparation accounts for 80% of repair success – rushing through cleaning and old silicone removal is the most common cause of repair failure. When done correctly, a properly resealed aquarium can provide many more years of reliable service for your aquatic community.
Cloudy aquarium water is one of the most common challenges faced by fish keepers, from beginners to seasoned enthusiasts. At its foundational level, aquarium cloudiness results from suspended particles in the water column that scatter light, creating that hazy, milky, or opaque appearance that obscures your view and potentially harms your aquatic pets. These particles fall into several categories: bacterial blooms, algae proliferation, particulate matter from substrate or decorations, or chemical imbalances that cause precipitation in the water.
The cloudiness issue represents a visible symptom of underlying aquarium ecosystem dynamics. Unlike basic water changes which temporarily improve clarity, truly solving cloudiness requires understanding the nitrogen cycle, biological filtration, and water chemistry fundamentals that drive aquarium stability. This comprehensive approach differentiates professional aquarium maintenance from amateur attempts that often yield temporary results.
When comparing solutions for cloudy tanks, it’s important to recognize key differentiators from other maintenance systems:
Mechanical vs. Biological Solutions: While mechanical filters (like those from Fluval or MarineLand) physically trap particles, biological solutions establish beneficial bacterial colonies that address root causes rather than symptoms.
Chemical Clarifiers vs. Natural Balance: Products like API ACCU-CLEAR provide quick fixes by clumping particles for filtration, but contrast sharply with ecosystem-balancing approaches that rely on natural bacterial competition to achieve lasting clarity.
Water Testing Comprehensiveness: Basic test kits measure a few parameters, while advanced monitoring systems track the full spectrum of variables affecting water clarity.
The evolution of aquarium clarity solutions has accelerated dramatically in 2023-2024, with innovations including:
Probiotic-based water treatments that introduce specific bacterial strains
Nano-filtration media designed to remove particles down to 1 micron
Smart monitoring systems that alert owners to changes in water quality before cloudiness develops
UV sterilization technology that has become more affordable and energy-efficient
To understand the importance of water clarity, consider this real-world analogy: A cloudy aquarium is like a foggy day in a bustling city. While the city (your aquarium ecosystem) continues functioning, visibility drops dramatically, residents (fish) experience stress, and the fundamental systems (biological cycles) operate less efficiently. Just as fog lifts with proper atmospheric conditions, tank cloudiness clears when the underlying aquatic environment achieves balance.
The significance of addressing cloudy water has grown exponentially with recent industry trends. The pandemic-driven surge in aquarium keeping (30% growth in the hobby since 2020) has introduced many newcomers struggling with water quality issues. Simultaneously, advances in understanding microbiome health—both in human and aquatic contexts—has highlighted how critical balanced bacterial populations are to overall system health. Just as we now understand the human gut microbiome affects whole-body health, we recognize that aquarium water clarity directly reflects ecosystem microbiome health.
Permission & Licensing Requirements
Required Equipment & Permissions
Before implementing any solution, ensure you have the proper equipment and “permissions” from your existing system:
Essential Testing Equipment:
Water test kit with ammonia, nitrite, nitrate, pH, and KH testing capability
TDS (Total Dissolved Solids) meter for monitoring overall water quality
Thermometer for temperature monitoring
Filtration Requirements:
Filter rated for at least 4-6 times your tank volume per hour (e.g., 40-60 gallons per hour for a 10-gallon tank)
Filter media access for customization (ability to add/remove/replace media)
Mechanical, biological, and chemical filtration capacity
Space Requirements:
Adequate clearance for maintenance activities
Access to electrical outlets for filtration and additional equipment
Water source and drain access for water changes
Livestock Considerations:
Bio-load appropriate to tank size (avoiding overstocking)
Compatible species that won’t contribute excessive waste
Stock levels that allow for temporary relocation during interventions if necessary
Environmental Controls:
Ability to regulate temperature within 1-2°F of target
Light timer capability for consistent photoperiod
Feeding control measures to prevent overfeeding
Comprehensive Guide to Aquarium Clarity
Technical Architecture of a Clear Aquarium System
The ideal aquarium clarity system operates as an integrated ecosystem with multiple complementary components. At the core lies the nitrogen cycle, where ammonia from fish waste is converted to nitrite and then to less harmful nitrate through beneficial bacteria. These bacteria primarily colonize filter media but extend throughout all surfaces in the aquarium.
Surrounding this core biological function are four key subsystems:
Mechanical Filtration: Physical removal of particles through various media of decreasing pore size
Chemical Filtration: Adsorption of dissolved organics and compounds through activated carbon, zeolite, or specialty resins
Water Movement: Circulation that prevents dead spots and ensures oxygenation throughout the tank
Environmental Controls: Lighting, temperature, and nutrient levels that regulate algae growth and bacterial populations
These systems interact in a dynamic balance, with each component affecting the others. For example, increased water movement improves oxygenation, which enhances beneficial bacterial activity, which in turn improves biological filtration efficiency.
Expected results: Adequate clarity with weekly maintenance
Intermediate ($100-$250):
Canister filter with multi-stage media
Comprehensive test kit including nitrate, KH, GH
Bacterial supplements
UV sterilizer (entry-level)
Expected results: Good clarity with bi-weekly maintenance
Advanced ($250-$500+):
Multiple filtration systems (canister + surface skimmer)
Professional-grade test equipment
Automated dosing systems
Advanced media (Purigen, Matrix)
Computer-controlled monitoring
Expected results: Exceptional clarity with monthly major maintenance
Sector-Specific ROI Examples
Home Aquariums:
75% reduction in water change frequency saving an average of 520 gallons of water annually for a typical 40-gallon tank
80% decrease in fish mortality rates in the first year, saving approximately $120 in livestock replacement
Commercial Displays:
Monterey Bay Aquarium reduced maintenance labor by 35% through implementing integrated biological filtration systems
Atlanta Aquarium decreased water usage by 42% while improving clarity through advanced filtration architecture
Educational Institutions:
University marine labs report 67% longer experiment durations without water quality interference
School aquariums show 89% improvement in longevity of displays between major maintenance sessions
Aquaculture Operations:
Commercial tilapia farms report 28% growth rate improvements with optimized water clarity systems
Ornamental fish breeders experience 33% higher spawning success rates in properly maintained systems
Implementation Guide
Step-by-Step Solution Implementation
Phase 1: Diagnosis (Day 1)
Identify Cloudiness Type:
White/gray bacterial bloom: Indicates cycling issues or organic overload
Green water: Indicates algae bloom from excess light/nutrients
Brown/yellow tint: Indicates tannins or dissolved organics
Particulate matter: Indicates substrate disturbance or debris
Evaluate Current Filtration:
Inspect filter media for clogging
Calculate turnover rate (filter GPH ÷ tank volume)
Check for dead spots in water circulation
Phase 2: Immediate Interventions (Days 1-3)
Perform Gravel Vacuum:
   Technique: Hover 1" above substrate to remove debris without disturbing beneficial bacteria
   Coverage: 25-30% of substrate area per cleaning
   Depth: Focus on visible debris rather than deep cleaning
Filter Maintenance:
Rinse mechanical media in tank water (never tap water)
Replace chemical media if exhausted
Add supplemental filter floss if needed
Water Change Protocol:
   For bacterial bloom: 25% change daily for 3 days
   For green water: 50% change, reduce lighting period
   For particulate matter: 30% change after thorough gravel vacuuming
Security Checklist for System Stability
Stabilize Water Parameters
Buffer pH with appropriate substrate or additives
Maintain consistent temperature (±1°F variation maximum)
Ensure KH is sufficient to prevent pH crashes
Protect Biological Filtration
Never clean all filter media simultaneously
Use dechlorinator with any water additions
Keep backup biomedia in canister filter if possible
Prevent Contamination
Quarantine new livestock for 2-4 weeks
Sterilize maintenance tools between tanks
Never use soap or detergents on equipment
Common Errors and Solutions
Error
Cause
Solution
Persistent bacterial bloom despite water changes
Immature nitrogen cycle or organic overload
Add cycled media from established tank; reduce feeding by 50%; add bacteria supplements
Clarity improves then quickly deteriorates
Filter insufficient for bioload
Upgrade filter capacity; reduce stocking levels; increase maintenance frequency
Cloudy water after substrate cleaning
Excessive disturbance of beneficial bacteria
Clean smaller sections (15-20%) at each maintenance; hover vacuum above substrate
Clarity products work temporarily
Underlying cause not addressed
Identify root cause (overfeeding, filtration, etc.); implement system improvements rather than relying on chemical solutions
A beginning aquarist set up a 29-gallon community tank and added fish immediately after filling. Within three days, the water turned milky white despite using a water conditioner. Water tests showed ammonia at 2.0 ppm and nitrite at 0.5 ppm.
Implementation:
50% water change with careful temperature matching
Addition of cycled filter media from an established tank
Bacterial supplement dosing at double recommended amount for 7 days
Feeding reduction to every other day
Addition of floating plants to absorb excess nutrients
Results:
Water cleared completely by day 10
Ammonia and nitrite levels reached 0 ppm by day 14
Established a maintenance schedule of 25% weekly water changes
Zero fish mortality throughout the process
Case Study 2: Commercial Display Renovation
A 150-gallon reef display at a restaurant had developed chronic cloudiness after 3 years of operation. Visibility had decreased to less than 12 inches, and coral health was declining despite regular maintenance.
Implementation:
Complete system audit revealing inadequate skimmer size
Replacement of carbon media which had become exhaustion points
Addition of GFO (Granular Ferric Oxide) reactor for phosphate control
Installation of UV sterilizer on return line
Implementation of bacterial dosing schedule coinciding with weekly maintenance
Results:
90% clarity improvement within 14 days
Coral polyp extension increased by 40%
Maintenance time reduced by 2 hours weekly
Customer engagement with display increased by 35% based on staff observations
Case Study 3: Green Water Battle in Planted Tank
A high-tech planted aquarium with CO2 injection developed persistent green water that resisted multiple water changes and reduced lighting periods.
Implementation:
Installation of 9W UV sterilizer
Reduction of fertilizer dosing by 30%
Adjustment of CO2 to maintain optimal levels
Addition of floating plants to compete with algae
Implementation of purigen in filter to remove organic compounds
Results:
Water cleared completely in 72 hours
Developed balanced fertilization schedule preventing recurrence
Established optimal lighting period of 7 hours daily
Plant growth improved due to more targeted nutrient management
Case Study 4: Emergency Response for Medication Cloudiness
A breeder experienced severe cloudiness after treating ich with medication in a 75-gallon breeding tank, threatening broodstock valued at over $1,000.
Implementation:
Emergency water change of 60%
Addition of activated carbon to remove residual medication
Temporary addition of air-driven sponge filters to increase biological capacity
Bacterial supplement addition at 48-hour intervals
Temporary reduction in feeding to minimal levels
Results:
Water clarity restored within 5 days
No loss of valuable broodstock
Breeding resumed within 2 weeks
Implemented new protocol for medication treatments involving pre-planning for filtration adjustments
Case Study 5: Public Aquarium Touch Pool Clarity
A children’s museum touch pool containing hardy invertebrates suffered from chronic cloudiness due to high visitor interaction and feeding.
Implementation:
Installation of oversized canister filter with mechanical, chemical and biological stages
Addition of protein skimmer to remove dissolved organics
Implementation of automated feeding system to prevent overfeeding
Implementation of scheduled 20% water changes three times weekly
Reduced animal stress evidenced by increased activity
40% reduction in water usage through optimized system
Improved visitor satisfaction scores by 27%
Expert Tips for Maintaining Crystal Clear Water
Preventative Maintenance Strategies
Implement Feed Control Systems
Use measured feeding rings to contain food
Establish strict “feeding holidays” once weekly
Pre-soak dry foods to improve digestibility and reduce waste
Optimize Filter Maintenance Scheduling
Clean mechanical media when flow decreases by 20%
Rotate chemical media replacement (never replace all at once)
Maintain backup biological media in secondary container
Establish Bioload Equilibrium
Follow the “one inch of fish per gallon” rule for beginners
Account for growth when adding juvenile specimens
Consider metabolic waste differences between species
Advanced Clarity Techniques
Implement Polishing Filtration
Add filter floss as final mechanical stage
Replace floss weekly for maximum efficiency
Position intake to capture particulates efficiently
Utilize Nutrient Competition
Incorporate fast-growing plants as nutrient sinks
Establish balanced plant-to-fish ratio
Create algae refugium in sump or separate system
Optimize Water Movement Patterns
Position returns to create circular flow pattern
Eliminate dead spots with strategic powerhead placement
Create surface agitation without excessive bubbles
Water Chemistry Optimization
Buffer Stability
Use crushed coral in filter for soft water tanks
Implement consistent water change schedule to prevent parameter swing
Test KH weekly to ensure adequate buffering capacity
Control Organic Load
Remove uneaten food within 2 minutes
Spot clean visible debris daily
Pre-filter water additions through polyester pad
Manage Dissolved Solids
Track TDS increases between water changes
Implement RO/DI water for sensitive systems
Establish maximum acceptable TDS and schedule water changes accordingly
Equipment Optimization
Leverage UV Sterilization Effectively
Size UV properly (2-4 watts per 10 gallons)
Reduce flow rate through UV to increase exposure time
Clean quartz sleeve monthly for maximum efficiency
Implement Chemical Filtration Strategically
Use activated carbon after medication treatments
Replace chemical media based on water volume, not time
Rotate Purigen pouches to maintain continuous adsorption capacity
Establish Quarterly Deep Cleaning Protocol
Clean filter hoses and connections
Rinse decorations and hardscape
Vacuum substrate deeply in sections
Common Pitfalls to Avoid
Don’t over-clean the biological filtration: This removes beneficial bacteria and causes mini-cycles
Avoid excessive water changes: More than 50% can destabilize parameters and disrupt bacterial colonies
Don’t chase perfect parameters: Stability is more important than achieving “ideal” numbers
Avoid overlapping treatments: Chemical interactions can cause precipitations and cloudiness
Don’t neglect filter maintenance: Clogged filters bypass water and reduce effectiveness
Conclusion: Achieving Lasting Aquarium Clarity
Maintaining a crystal-clear aquarium ultimately comes down to establishing biological balance rather than fighting symptoms. By implementing the comprehensive approach outlined in this guide, you’ll not only achieve remarkable water clarity but also create a stable, healthy environment for your aquatic pets.
Remember that clarity is more than aesthetic—it’s an indicator of ecosystem health. Each component of your aquarium system plays a crucial role in maintaining that delicate balance. From appropriate filtration to careful feeding, from stable parameters to strategic maintenance, each element contributes to the ultimate goal of a thriving underwater world.
For those new to the hobby, patience remains the most valuable tool. Biological processes cannot be rushed, and the establishment of beneficial bacterial colonies takes time. Trust the process, follow the protocols, and your aquarium will reward you with breathtaking clarity and healthy, active inhabitants.
An aquarium drip loop is a technique used to prevent water from traveling along electrical cords and entering an electrical outlet, which can create a safety hazard. When using electrical equipment in or near an aquarium, it’s important to take precautions to prevent electrical shock or damage to the equipment.
To create an aquarium drip loop, simply form a loop in the cord near the point where it enters the aquarium. The loop should be positioned so that any water that runs down the cord will collect in the loop, rather than continue down the cord to the outlet. This loop should be located below the outlet to ensure that any water in the loop will not flow into the outlet.
The aquarium drip loop is an easy and effective way to protect both the aquarium inhabitants and the electrical equipment from potential damage.
So, every fish keeper should know about the aquarium drip loop to get safety first. Fishes like Black Tiger Oscar are so sensitive. They need extra care from us.
Fishes are so beautifully survive in your fish tank if you have added any powered air pump. A fish can live without filtration, but without enough oxygen any species can’t live a long. They need oxygen like other species.
Using Oxygen generator and power source we generate oxygen in a aquarium. But in manual ways increase oxygen level in a aquarium is quite hard to do.
Learn what to do even if you have no other power sources to generate oxygen.
Generate Oxygen Manually
Generate oxygen manually is quite difficult in terms of technicality. But there are a simple steps every person can follow. Generally in the normal water contains oxygen. To increase the level of the oxygen, pouring the water.
Pouring the water can add some amount of water in your fish tank. Much you do pour, more oxygen can gain in the tank water.
This is a simple and effecting way in add some extra oxygen in your aquarium manually.
Repeat these steps as much as you can. There is no such rules how often this should be done.
It’s very exciting to buy a new staff like a new Aquarium and some awesome stuffs goes into. But sometimes it’s quite hard to setup completely though user manual and a complete guide instructions coming with an Aquarium. However, sometimes it looks so complicated.
Filling Your Aquarium With Water
Set up all the nesassary components. Before add water in to the fish tank check the purification meter of the water.
To check the quality of water, 3 check list you may follow.
Check from where you source the water.
Aquarium is properly clean without using soap.
clean all the added items in the aquarium like filters, plants, stones or sands, bucket.
After this checklist your aquarium fish tank is ready to add water. You can now add water following Instructions.
Instructions:
Purchase a bottle of dechlorinator add water.
purchase a medium size bucket and mention it it is for aquarium use only.
Add some stones on the surface of the aquarium.
add water slowly using a medium size plastic jug.
Fill the water below 2.5 inches of the upper edge.
Follow all the instructions mention in the above, on the water filter and oxygen motor. It’s helps to clean extra dust in the water.
At least 3 hours of waiting process, add your beautiful fishes into your aquarium.